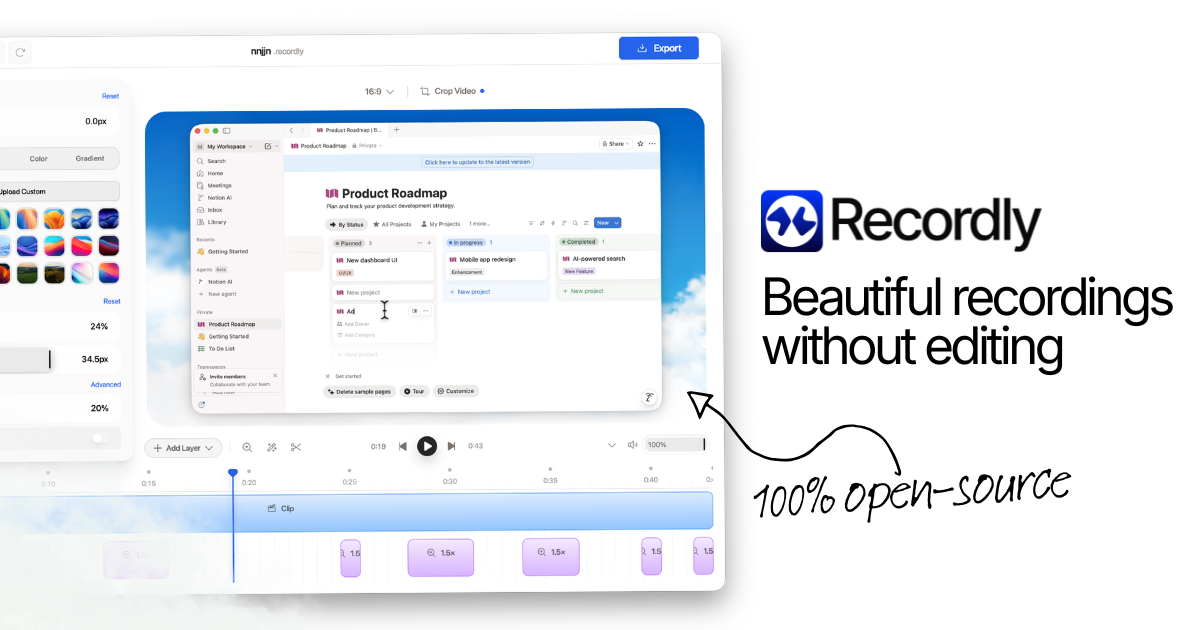

Recordly: Polishing Demo Videos with Open-Source Precision
Many developers find themselves in a recurring predicament: the need to create a clear, concise demonstration video. Whether it's to highlight a new feature for stakeholders, reproduce a bug for a quality assurance team, or create a quick tutorial for a colleague, the task often feels disproportionately complex. Traditional video editing suites are overkill; they demand specialized skills, significant time, and a steep learning curve for what should be a straightforward communication task. Recording is only part of the problem; post-production turns a raw screen capture into something presentable by adding focus, trimming dead air, and ensuring visual clarity.
Recordly is an open-source solution that streamlines this process. With an impressive 29,058 stars on GitHub, Recordly has attracted many users, showing its effectiveness in addressing this common developer pain point. This substantial adoption indicates the project solves a real problem in a way that resonates with a broad audience. This article explores Recordly's architectural philosophy, walks through a practical use-case, uncovers its underlying technical stack, guides you through building and extending it, and details the process for contributing to its open-source development. By the end, you'll understand Recordly's capabilities and its place in the modern developer's toolkit.
The Core Philosophy: Explaining the Why
The fundamental philosophy is eliminating the need for post-production editing for everyday demo videos. It aims to bridge the gap between a raw screen recording and a polished, professional output, without requiring any video editing skills from the user. This objective directly informs its architectural and design decisions and differentiates it significantly from more comprehensive screen recording or video editing tools.
The maintainers of Recordly made a deliberate choice not to solve the problem of full-fledged video editing. This means Recordly will not offer a multi-track timeline, advanced color grading, complex transitions, or fine-grained audio manipulation. This constraint is a design feature, not a limitation; by focusing exclusively on automated polishing, Recordly avoids the complexity and feature bloat that often accompany general-purpose video editors. This narrow scope allows for an optimized user experience tailored for creating polished demo content quickly.
This design decision introduces several trade-offs. The primary trade-off is simplicity and speed over absolute creative control. A professional video editor offers infinite flexibility. Recordly trades that for an opinionated, automated workflow. Its internal processing pipeline applies common "polish" effects—like intelligent zooming, cursor highlighting, and smooth transitions—algorithmically. This means a developer can record a sequence of actions, and Recordly automatically enhances the recording to emphasize interactions, making the content more engaging and easier to follow without manual intervention.
How does this philosophy differ from its closest competitors? Tools like OBS Studio are powerful and flexible for live streaming and complex recordings, but they offer minimal automated post-production and require user expertise for setup and output quality. Commercial alternatives like ScreenFlow or Camtasia provide extensive editing capabilities but come with a cost, a learning curve, and often more features than a developer needs for a quick demo. Recordly carves out its niche by prioritizing effortless polish and ease of use, making it an ideal choice when the goal is a clear, professional demo video produced in minutes, not hours.
The project's opinionated defaults are important for its success. Features such as automatically zooming in on cursor clicks, smoothly panning across the screen as the user interacts with different elements, and providing subtle visual cues for keyboard inputs are all examples of these defaults. The reasoning is clear: these are common techniques professional editors use to guide viewer attention and enhance clarity. By baking them into the recording process, Recordly ensures a consistent, high-quality output every time, removing the cognitive load and time investment of manual editing from the developer. This focus on "no-editing" polish is the essence of Recordly's "why."
A Practical Use-Case Walkthrough
Consider a scenario where a backend developer has just implemented a new API endpoint and needs to demonstrate its usage to the frontend team, including a quick walkthrough of the request and response in an HTTP client like Postman or Insomnia. Traditionally, this would involve a raw screen recording, followed by time-consuming edits to crop, zoom, and highlight relevant parts of the interface. With Recordly, this process is significantly streamlined.
The developer's starting state: Recordly is installed and running on their machine, and the API endpoint is functional.
Here’s a step-by-step walkthrough:
- Launch Recordly: The developer opens the Recordly application, which presents a clean, minimalist interface.
- Select Recording Area: Recordly typically offers options to record the entire screen, a specific application window, or a custom-defined region. For this scenario, the developer chooses to record a specific application window—their HTTP client (e.g., Postman) and potentially a terminal window showing the API logs.
- Configure Audio Input (Optional): If the developer wishes to provide a voiceover explaining the steps, they select their microphone input from Recordly's settings panel.
- Start Recording: With the area selected, the developer clicks the "Start Recording" button. A brief countdown typically appears before recording begins.
- Perform the Demonstration:
- The developer navigates to the request in Postman.
- They highlight (by clicking or hovering) the various parameters in the request body.
- They send the request, demonstrating the successful (or unsuccessful) response.
- They might switch briefly to a terminal to show the server logs that correspond to the API call.
- They perform any additional clicks or scrolls necessary to explain the feature or bug.
- Stop Recording: Once the demonstration is complete, the developer stops the recording via a hotkey or a system tray/menu bar icon.
- Automated Polish and Export: Recordly immediately processes the raw footage. Internally, it identifies cursor movements, clicks, and significant UI changes. It then automatically applies its signature polish:
- Intelligent Zooms: As the developer clicks on a specific field in Postman, Recordly zooms in slightly on that area, drawing the viewer's attention.
- Smooth Panning: When the developer scrolls through the JSON response, Recordly smoothly pans the view, rather than showing jarring jump-cuts.
- Cursor Highlighting: The cursor is subtly highlighted, making it easy to track its path.
- Transition Effects: Recordly transitions between different focal points, ensuring a professional flow without any manual editing.
- Review and Share: After processing, a preview of the polished video is often available. The developer can then export the final video to a common format like MP4, ready to be shared with the frontend team.
This process transforms what could be a laborious task into a quick, efficient workflow, allowing the developer to focus on the technical explanation rather than video production.
To install Recordly for a developer environment:
# For macOS using Homebrew (if available in a tap):


# brew install --cask recordly


# For Linux (Debian/Ubuntu-based systems, downloading the .deb from releases):


# Check https://github.com/webadderallorg/Recordly/releases for the latest version


LATEST_VERSION="X.Y.Z" # Replace with actual latest version, e.g., "1.0.0"


wget "https://github.com/webadderallorg/Recordly/releases/download/v${LATEST_VERSION}/recordly_${LATEST_VERSION}_amd64.deb"


sudo dpkg -i "recordly_${LATEST_VERSION}_amd64.deb"


sudo apt-get install -f # To fix any missing dependencies


# For Windows, download the .exe installer from https://recordly.dev or GitHub releases


# and run it.
Note: Replace X.Y.Z with the actual latest version number found on the Recordly GitHub releases page or website.
Under the Hood: The Actual Tech Stack
Recordly's ability to provide a cross-platform, desktop-grade recording experience while using modern web technologies is primarily thanks to its foundation on Electron. This framework allows Recordly to be built using web technologies like HTML, CSS, and JavaScript/TypeScript, while still functioning as a native desktop application across Windows, macOS, and Linux. The primary language for the project, as indicated by its GitHub repository, is TypeScript, providing type safety and better maintainability for its codebase.
The architecture typically splits into two processes within an Electron application: the main process and the renderer process.
-
The main process (Node.js environment) handles native operating system interactions: creating and managing browser windows, interacting with system menus, managing power states, accessing native screen recording APIs, and handling application lifecycle events.
-
The renderer process (Chromium environment) is a web browser window where the user interface is rendered. This is where the React, Vue, or Angular components, along with their associated TypeScript logic, reside, creating the interactive elements the user sees and interacts with.
Regarding data and content structure, Electron applications generally adhere to platform-specific conventions for user data storage. Configuration settings, such as preferred recording resolution, audio input devices, or export presets, are typically stored in JSON files within the user's application data directory.
-
On macOS:
~/Library/Application Support/Recordly/ -
On Windows:
%APPDATA%\Recordly\(e.g.,C:\Users\YourUser\AppData\Roaming\Recordly\) -
On Linux:
~/.config/Recordly/
These directories usually contain a config.json or settings.json file. The actual recorded video data is initially stored in a temporary location, then processed and exported to a user-specified destination, often in an MP4 format.
The project's internal structure reflects a typical Electron setup, allowing for clear separation of concerns between native functionality and UI logic. A simplified view of the top-level directory structure, common for Electron-TypeScript projects, might look like this:
recordly/

├── src/

│   ├── main/                 # Electron main process code (TypeScript)

│   │   ├── index.ts          # Main entry point for Electron app

│   │   ├── preload.ts        # Script to run before renderer process loads, enhances security

│   │   └── services/         # Modules for native screen capture, file I/O, OS interactions

│   ├── renderer/             # Renderer process (UI) code (TypeScript/React/Vue)

│   │   ├── App.tsx           # Main application component (e.g., React)

│   │   ├── components/       # Reusable UI components

│   │   ├── styles/           # Global or component-specific stylesheets

│   │   ├── pages/            # View-specific components (e.g., Recording, Settings)

│   │   └── index.ts          # Entry point for the UI rendering

│   └── common/               # Shared types, interfaces, utility functions used by both processes

├── public/                   # Static assets, HTML template for the renderer process

│   ├── index.html            # The main HTML file loaded by the renderer

│   └── assets/               # Images, icons, fonts

├── package.json              # Project dependencies, scripts, and metadata

├── tsconfig.json             # TypeScript compiler configuration

├── electron-builder.yml      # Configuration for Electron Builder to package the app

└── README.md                 # Project documentation
The build and deployment approach for Recordly is likely handled by Electron Builder or Electron Packager. These tools automate the process of packaging the Electron application into distributable formats specific to each operating system (e.g., .dmg for macOS, .deb/.rpm for Linux, .exe for Windows). They often include features for generating installers, handling code signing, and configuring auto-updates, ensuring a smooth installation and maintenance experience for end-users across various platforms. The use of Electron Builder is a verifiable and common convention for such applications.
Building or Extending It: A Practical Guide
For developers looking to inspect Recordly's internals, propose new features, or customize it for specific team requirements, getting the project running locally is the first step. The process follows a standard open-source development workflow.
First, you'll need Git for cloning the repository and Node.js (which includes npm) or Yarn for managing dependencies.
-
Clone the repository:
git clone https://github.com/webadderallorg/Recordly.git -
Navigate into the project directory:
cd Recordly -
Install dependencies:
npm install # or if you prefer Yarn: # yarn install -
Run the application in development mode: This will typically compile the TypeScript, bundle the assets, and launch the Electron application with developer tools enabled.
    npm run dev

    # or if using Yarn:

    # yarn dev
This command usually watches for file changes and hot-reloads the application, accelerating the development cycle. For a production-like build, you might use
npm run buildfollowed bynpm run start, butdevis ideal for active development.
Extending or customizing Recordly for your own team might involve modifying its internal logic for applying effects or integrating with proprietary tools. A realistic example of customization could be adjusting the default recording settings or adding a new export preset. Let's assume Recordly's configuration is driven by a settings.json file managed via its UI, but for a local build, you might hardcode or extend capabilities.
Consider adding a new default video resolution preset or modifying how the cursor highlight effect behaves. This would typically involve modifying files within the src/renderer directory (for UI settings) and src/main (for how those settings are applied to the recording process).
// src/common/config.ts - Example of a configuration file for default settings

// (This is illustrative; actual file paths and structures may vary)


export interface RecordlySettings {

  defaultResolution: { width: number; height: number; };

  framerate: number;

  cursorHighlight: {

    enabled: boolean;

    color: string;

    radius: number;

  };

  // ... other settings

}


export const DEFAULT_RECORDLY_SETTINGS: RecordlySettings = {

  defaultResolution: { width: 1920, height: 1080 }, // Default Full HD

  framerate: 30, // Default 30 FPS

  cursorHighlight: {

    enabled: true,

    color: '#FFD700', // Gold color for highlight

    radius: 15,       // Radius in pixels for the highlight circle

  },

  // Add a new custom preset here:

  customPresets: [

    { name: 'Web Demo 720p', resolution: { width: 1280, height: 720 }, framerate: 24 },

    { name: 'Bug Report 1080p', resolution: { width: 1920, height: 1080 }, framerate: 30 }

  ]

};


// You might then modify the UI in src/renderer/components/SettingsPage.tsx

// to allow selection of these custom presets, and the main process logic

// in src/main/recordingService.ts to apply these settings during capture.
In this snippet, a developer could add or modify the customPresets array to include specific resolutions or framerates relevant to their team's standard deliverables, or tweak the cursorHighlight properties to match branding guidelines.
One common problem when diving into Electron development is managing communication between the main and renderer processes. Direct access is not allowed; instead, you must use Electron's ipcRenderer and ipcMain modules for inter-process communication (IPC). Forgetting this can lead to frustrating debugging sessions where UI events don't trigger native actions, or vice-versa. Always remember to channel data and commands through the IPC bridge for secure and stable interaction between the UI and the underlying system processes.
Contributing to the Project: The Open-Source PR Process
Contributing to Recordly helps improve the tool and deepens your understanding of cross-platform desktop application development with Electron and TypeScript. The process, like most open-source projects, starts with understanding when and how to engage.
Step 0: When to open an Issue vs. a PR
-
Open an Issue BEFORE a PR for:
-
New features or significant enhancements: If you have an idea for a major addition, discuss it first. This ensures your contribution aligns with the project's vision, prevents duplicate effort, and allows maintainers to provide guidance.
-
Architectural changes: Any proposal that alters components, dependencies, or the overall structure should be vetted through an issue.
-
Complex bug fixes: For bugs that might have multiple solutions or require deeper investigation, opening an issue helps consolidate information and determine the best approach.
-
-
Go straight to a PR for:
-
Typo fixes and content improvements: Small corrections in documentation, UI text, or comments.
-
Minor bug fixes: Obvious bugs with clear, straightforward solutions.
-
Small code cleanups: Refactoring minor parts of the code without changing functionality.
-
Step 1: Fork, Clone, Install
Begin by creating your own fork of the webadderallorg/Recordly repository on GitHub. Then, clone your fork to your local machine and install dependencies:
git clone https://github.com/YOUR_GITHUB_USERNAME/Recordly.git
cd Recordly
npm install
Step 2: Locate the Correct File and Follow Conventions
Before making changes, familiarize yourself with the project structure (as described in "Under the Hood").
- UI/Feature changes: Likely within
src/renderer/. For example, a new button would go into a component file (e.g.,src/renderer/components/Toolbar.tsx). - Core logic/Native interactions: Changes related to screen capture, file saving, or OS-level events will be in
src/main/. - Shared types/utilities:
src/common/. - Styling:
src/renderer/styles/or component-specific style files.
Adhere to the project's coding style, which usually means consistent TypeScript formatting (e.g., using Prettier or ESLint, which are likely configured in package.json scripts). Variable naming, function signatures, and file organization should match existing patterns.
Step 3: Quality Bar for Contributions
Maintainers typically look for:
- Clear purpose: Your change should solve a defined problem or add a justified feature.
- Readability and maintainability: Code should be clean, well-commented where necessary, and easy to understand.
- Correctness: The change must work as intended and not introduce new bugs. Include tests if applicable and if the project has a testing framework.
- Minimal impact: Avoid making unnecessary broad changes. Focus your PR on a specific problem.
- Consistency: Follow existing architectural patterns, coding styles, and UI/UX guidelines.
Contributions that are hard to understand, don't align with the project's philosophy, or break existing functionality are likely to be rejected or require significant revisions.
Step 4: Open a PR
Once your changes are complete, tested locally, and committed to a new branch in your fork:
- Commit your changes: Write clear, concise commit messages.
git add . git commit -m "feat: Add custom resolution preset option" - Push your branch to your fork:
git push origin your-feature-branch - Open a Pull Request: On GitHub, navigate to your forked repository. GitHub will usually prompt you to open a PR to the
webadderallorg/Recordlyrepository'smainbranch from youryour-feature-branch.- Title convention: Use a clear, descriptive title. Many projects use conventional commits (e.g.,
feat: Add custom resolution preset,fix: Resolve screen flickering on macOS). - Description checklist: Provide a comprehensive description that includes:
- What it does: A clear explanation of the changes.
- Why it's needed: The problem it solves or the value it adds.
- How to test it: Instructions for maintainers to verify your changes.
- Screenshots/Gifs: For UI changes, visuals are invaluable.
- Reference any related issues (e.g.,
Closes #123).
- Title convention: Use a clear, descriptive title. Many projects use conventional commits (e.g.,
Post-Merge: After you open a PR, expect feedback from maintainers. They might suggest improvements, request changes, or simply ask for clarification. Be responsive and open to discussion. Once approved, your changes will be merged into the main repository, becoming part of Recordly for everyone to use. This iterative process is how open-source projects thrive.
Wrapping Up
Recordly is a pragmatic solution to a common problem for developers: creating professional-looking demo videos without the overhead of complex editing. Its thoughtful design prioritizes automated polish and ease of use, making it an invaluable tool for quickly conveying technical concepts.
The three most actionable takeaways from this deep dive are:
- Use automated polish: Recordly's strength is its ability to automatically enhance raw recordings with intelligent zooms, cursor highlights, and smooth transitions. This feature alone drastically reduces the time and skill required to produce presentable video content.
- Understand its Electron foundation: Knowing that Recordly is an Electron application built with TypeScript clarifies its cross-platform nature and informs how you can build, extend, or troubleshoot it by understanding the main/renderer process separation and IPC communication.
- Contribute strategically: Engage with the project by opening issues for significant ideas or complex bugs before writing code, and use pull requests for focused, well-tested improvements, adhering to established coding and PR guidelines.
Recordly offers a compelling vision for developer communication, simplifying the video creation process without sacrificing quality. We encourage you to explore Recordly further, download the application, and consider contributing to its ongoing development. Discover its capabilities and join its community on Fossy at https://fossy.dev/webadderallorg/Recordly.